What can be more beautiful than an elegant manicure? Only its creation with the use of gel varnish! This method not only guarantees stylish nail coverage, but also allows you to achieve the perfect result with amazing speed. However, in order for a gel-lacquer manicure to turn out high-quality, durable and aesthetically pleasing, it is important to follow certain rules.
1. All layers should be applied very thinly. If you do not follow the technology of applying gel-lacquer, the following problems may occur: waves and jagged edges on the free edge, air bubbles on the entire surface of the nail.
2. Using bright, pastel colours, we apply 2 layers of gel-lacquer. Each layer should be polymerised in UV-lamp for 2 minutes (in LED-lamp for 30 seconds).
3. When working with dark colours, the first layer may be unevenly coloured. There is nothing to worry about. You do not need to apply a large amount of gel varnish. This problem will be corrected by the second layer. Working with dark tones, it is better to make three thin but even layers than two dense, which will go in waves.
4. Do not forget to cover the end of the nail, pay attention to the uniformity and smoothness of the coating.
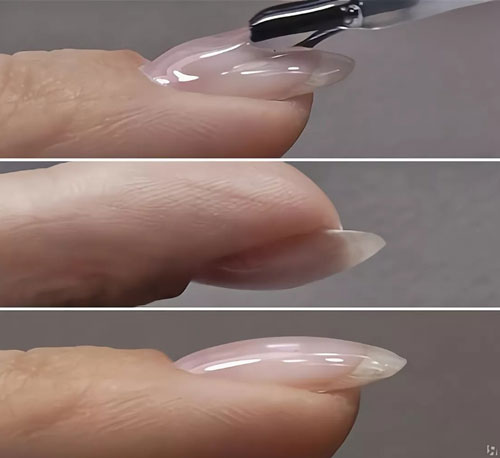
5. The final stage of the technology of applying gel-lacquer - coating with finishing gel - Top Coat. Finish gel is applied in a slightly thicker layer than the coloured one. Again, do not forget about the ends of the nail. The finishing gel should be well dried. Insufficient polymerisation of the gel will lead to the fact that when removing the sticky layer will lose shine. Dry it in UV-lamp for 2 minutes, in LED-lamp - 30 seconds. Remove the dispersion layer with a special Cleanser - it gives the coating a beautiful glossy shine. Cleanser contains moisturising components that protect the nail plate and skin from drying out.
1. Irregularities and imperfections on the pavement surface
If your cuticle gel polish is applied unevenly, with a bumpy or jagged line at the nail bed, it can lead to premature chipping as the nail grows back. You may even have to update the design to make it look neater and more aesthetically pleasing.
2. Vulnerability of the design
If the technician does not completely remove the pterygium and eponychium in the subcuticle area of the nail, water and household chemicals that get in there can shorten the life of the nail coating. In the end, trying to save money can lead to additional costs, as the coating will have to be renewed more often.
3. Design with aesthetic flaws
Inexperienced masters, performing this design, often inadvertently leave drops of gel-lacquer on the cuticle or side rollers. With deep colouring of the nail plate this is unacceptable. Pigmented skin as a minimum looks ugly, and as a maximum - can lead to an allergic reaction to gel varnish.
4. Damage to natural nails
The technique "under the cuticle" requires a very thorough preparation of the matrix zone (root zone of the nail). Excessive cleaning and pressure on the nail can lead to the risk of fungal infection or even nail plate detachment.
The safety technique of applying gel varnish to the nails requires a minimum distance of 1 mm from the cuticle area. This protects the nails from harmful bacteria and provides at least minimal oxygen access to the nail plate.
- If you have fragile, thin, weak nails, use plastic pushers or an orange stick. It is even preferable to remove it from the nail and from under the overhanging peri-nail skin. There is less pressure on the nail and less risk of injury.
- Protect the cuticle and adjacent skin with special preparations - "skinfenders".
- If you don't have a rubber-based cuticle protection product on hand, as well as wooden sticks for correction, use a clean nail polish brush and shellac remover.
- If the moment of correction is still missed, after drying your manicure in the lamp, apply Global Fashion Cuticle Softening Remover to the dried gel varnish, wait for some time and scrape off the flaws from the skin with a sharp metal pusher.
Secrets of gel varnish application
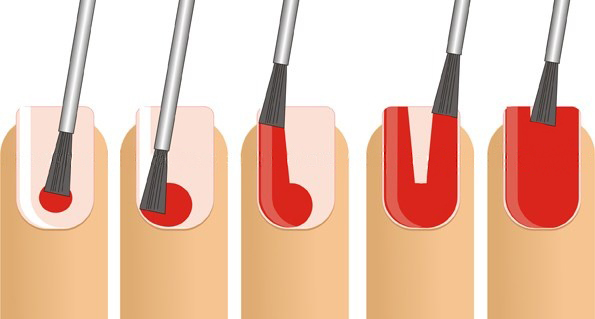
- After applying some gel polish to the nail, place the brush at a 45 degree angle to the nail (lift the back roller and pull it away with your finger);
- Use the pointed corner of the brush to make a half-circle stroke, fanning the brush. Repeat the same application on the other side of the nail;
- Usually the centre area of the nail is already relatively evenly painted. However, to be sure, apply a few strokes to even out the colour. If you need to remove over-applied colour, increase the angle of the brush on the nail. For a thicker application of colour, try to keep the brush almost resting on the nail.
Gel varnish application rules
- Apply layers thinly, which will allow you to reduce the formation of a dispersion layer (contact with which is undesirable for the skin);
- For even distribution of colour, do not forget to lift the pigment from the bottom of the bottle (by rolling the bottle briefly between your hands, or stirring with a native brush or toothpick);
- If this or that gel-lacquer you paint long enough and suddenly saw on the nail along with the coating micro-particles of plastic from the cap, this gel-lacquer do not apply immediately from the bottle. It will take a lot of time to remove the particles from under the cuticle. Drip gel lacquer on a palette, remove unwanted flecks and paint directly from it;
- Sealing the end, work almost dry brush. Otherwise, when polymerising in the lamp on the free tip may form an unsightly swell, a roll;
- If you have dried both layers of colour coating and found that the pigment of gel-lacquer crept to the centre of the nail, the dispersion layer of the base is to blame. Try to remove the excess with a dry brush or lightly blot the nail with a lint-free cloth (not all the stickiness, but only partially dry the nail);
- Massage the cuticle with creams, oils and waxes after creating the design. In this way, you will more quickly relieve the stress of the back roll control procedure and influence the rate of cuticle growth (in the direction of slowing them down). At the same time, practise gently pushing back the proximal roll after the massage has been performed. Over time, you will not only increase the length of the nail bed, but also improve the elasticity of the skin for subsequent subcuticle manicures.